Applications
Create a new application
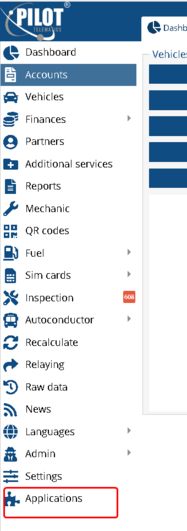
To create a new application, you must have access to the administration panel as a partner or administrator. In the "Applications" section of the main menu
Next, click the "Add" button, fill out the form and save it.
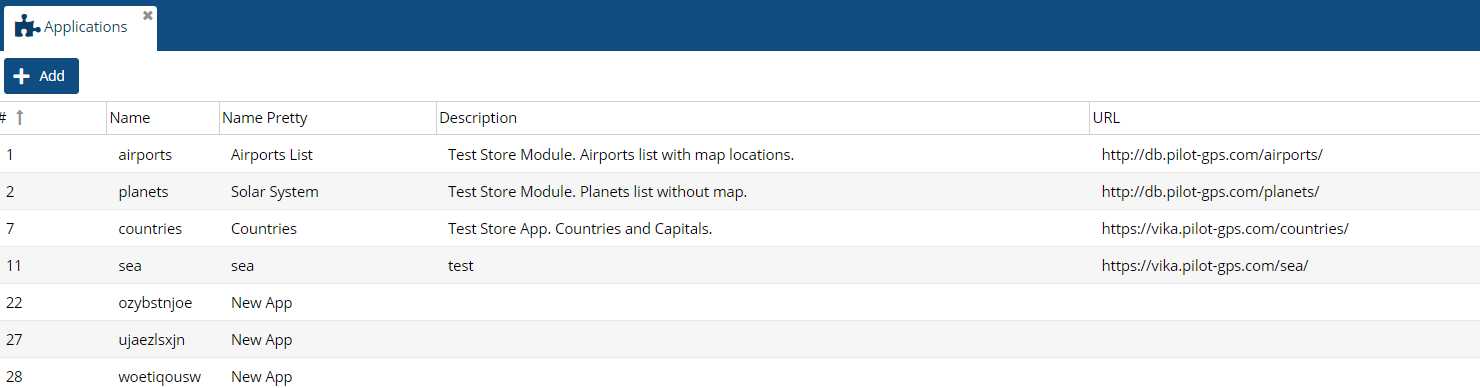
Parameter values:
-
Name - a unique name of the application, only Latin letters in lowercase.
-
Full name - An arbitrary applicaiton name that will be displayed in the app store.
-
Description - Brief description of the application that will be displayed in the app store.
-
URL - address - the network address where the application will be hosted by the author.
-
Icon Class - an icon from the fontawesome list that will be displayed in the app store (https://fontawesome.com/v5/search?o=r&m=free).
-
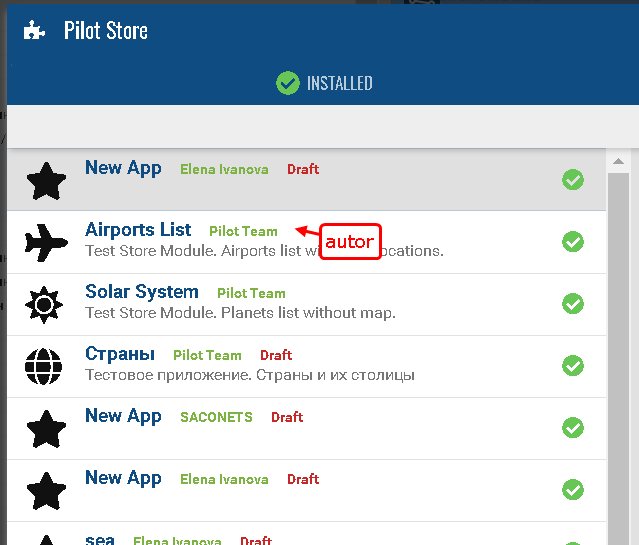
Author - the author of the application that will be displayed in the app store.
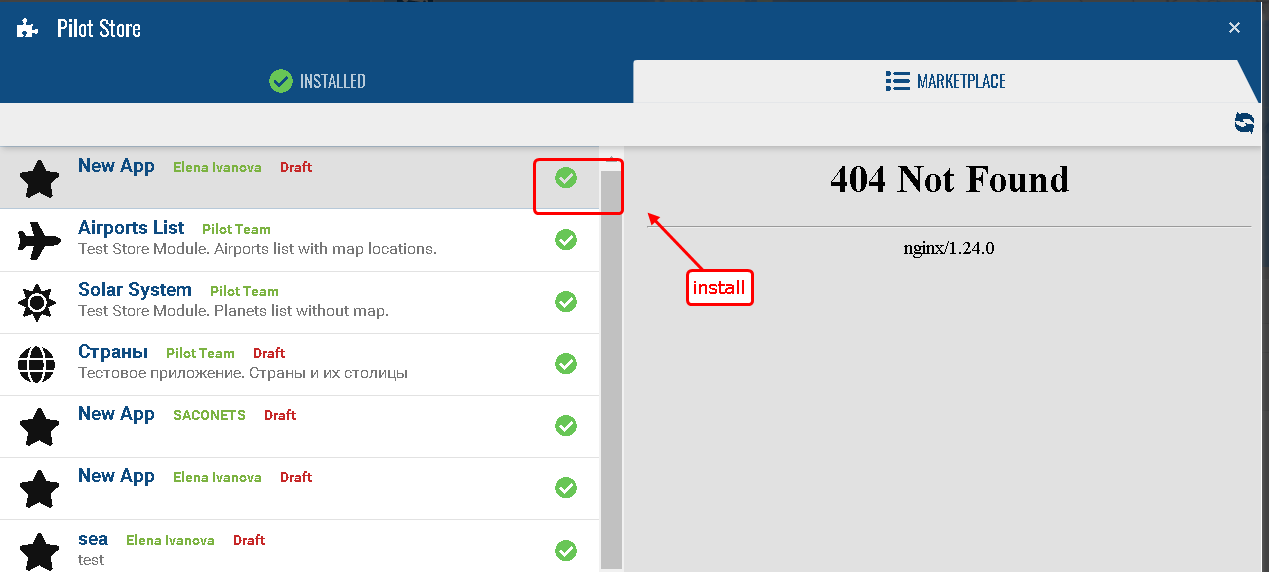
After creating the application, it is necessary to contact technical support to activate proxying to the application address. In the future, this process will be automated.
As a result, proxying from the address https://pilot-gps.com/store/{name} → application URL will be configured. For example https://pilot-gps.com/store/countries → http://example.com/countries
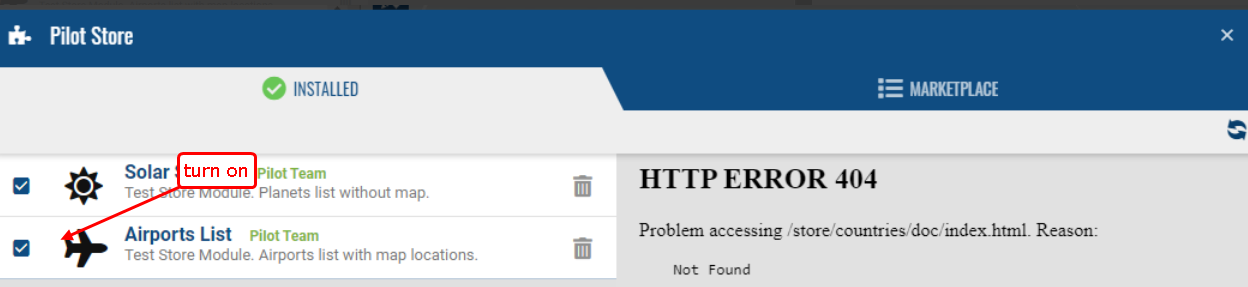
After that, it is possible to start building and testing the application. Until the final publication of the application (done by the technical support team), the application will be available in the app store only to users with the 'master' role (authorization from the admin panel), in the 'Draft' status.
We install the application in the contract on which we will test and turn on the application for the current user.
Application programming.
At startup, the application loads a base module called Store.{name}.Module.
For example: Store.countries.Module.
The module must be a descendant of the Ext.Component class and have the initModule function, which specifies the operations necessary to load the module and determined by the module's logic.
The module must be placed in the root folder of the project.
You can download all other necessary application files from it.
Module code example:
Ext.define('Store.airports.Module', {
extend: 'Ext.Component', // module initialization function
initModule: function () {
var cmp = this;
//create a panel - a bookmark for the navigation section
var nav = Ext.create('Store.airports.Tab', {});
//create a panel for display in the map area associated with the navigation panel
nav.map_frame = Ext.create('Store.airports.Map', {});
//placing elements in the right positions
skeleton.navigation.add(nav);
skeleton.mapframe.add(nav.map_frame);
//if you need to load css file
// load an additional style file
var css = document.createElement("link")
css.setAttribute("rel", "stylesheet")
css.setAttribute("type", "text/css")
css.setAttribute("href", '/store/airports/airports.css');
}
});
In this example, the module consists of 3 JS files - classes Store.airports.Module, Store.airports.Tab, Store.airports.Map
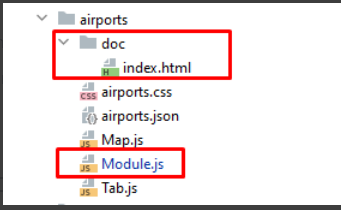
The only required files are Module.js and doc/index.html (application documentation that is displayed in the app store)
Everything else is determined by the logic of the project.
Access to any project files occurs along the path /store/{name}/
For example /store/countries/countries.css
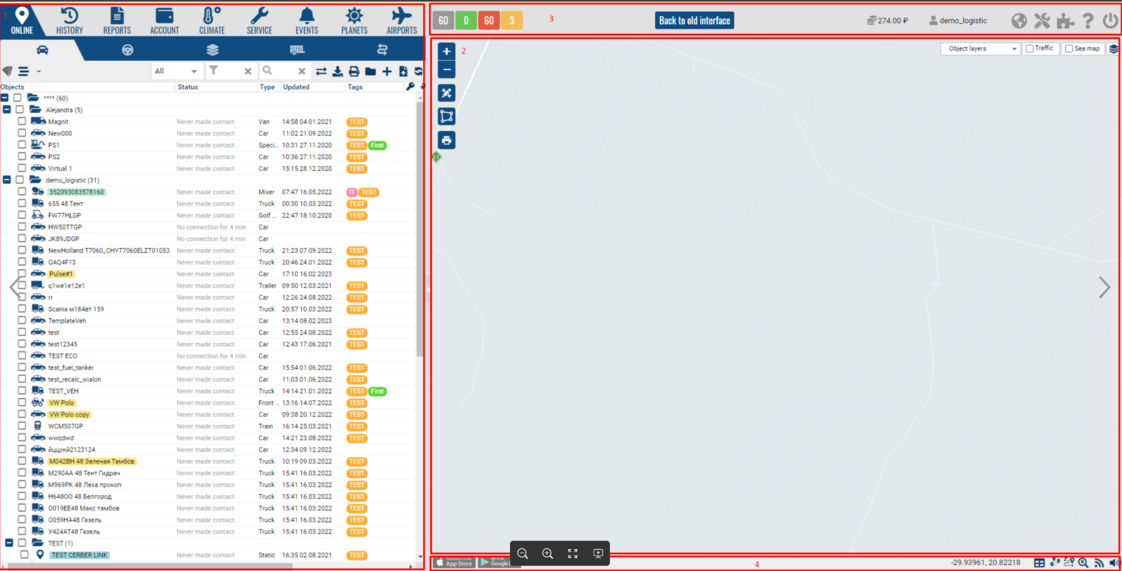
1 - skeleton.navigation
2 - skeleton.mapframe
3 - skeleton.header
4 - skeleton.footer
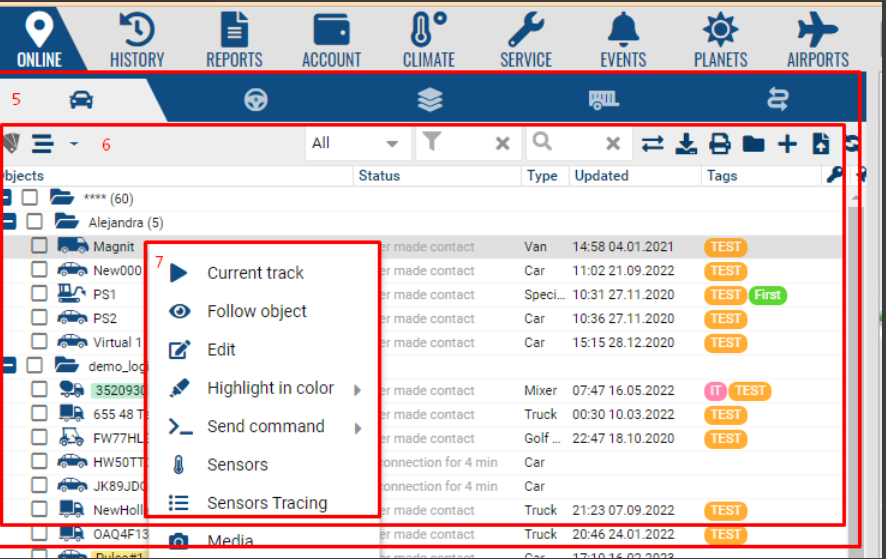
5 - skeleton.navigation.online
6 - skeleton.navigation.online.online_tree
7 - skeleton.navigation.online.online_tree.contextmenu
The global template for the PILOT window is available at the global reference skeleton. This is a global system panel with a border type layout. It is possible to embed additional panels into it.
Example:
|
Result:
skeleton.navigation - navigation bar. the component added to it must be inherited from the class Ext.panel. Panel or its descendants and have the parameters title and iconCls and iconAlign: 'top', to display the main menu tab.
Examples:
Ext.define('Store.airports.Tab', {
extend: 'Ext.grid.Panel',
xtype: 'store-airports-tab',
iconCls: 'fa fa-plane',
title:'Airports',
iconAlign: 'top',
layout: 'fit',
.......
Ext.define('Store.planets.Tab', {
extend: 'Ext.grid.Panel',
xtype: 'store-planets-tab',
iconCls: 'fa fa-sun',
title:'Planets',
iconAlign: 'top',
layout: 'fit',
........
Result:

skeleton.mapframe - map panel. It has a layout of type card. When creating a component added to it, it must be associated with an already created element in the navigation panel. In this case, it will open when you switch to the corresponding tab in the navigation panel.
Example:
var navigation=Ext.create('Store.planets.Tab',{});
var mapframe= Ext.create('Store.planets.Map',{});
navigation.map_frame =mapframe;
skeleton.navigation.add(navigation);
skeleton.mapframe.add(mapframe);
Result:

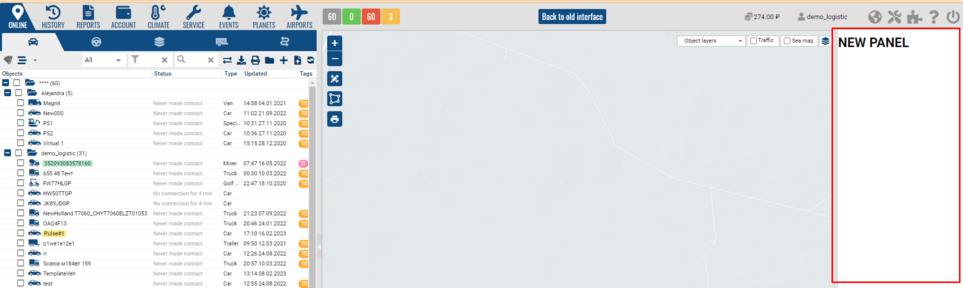
skeleton.header - top toolbar. You can add components to it using the add and insert methods.
Example:
skeleton.header.insert(4,{xtype:'button',iconCls:'fa fa-star',handler:function(){alert('STAR!');}});
Result:
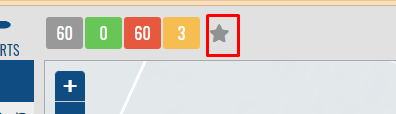
skeleton.footer - bottom toolbar. You can add components to it using the add and insert methods.
Example:
|
skeleton.footer.insert(4,{xtype:'button',iconCls:'fa fa-star',handler:function(){alert('STAR!');}});
|
Result:

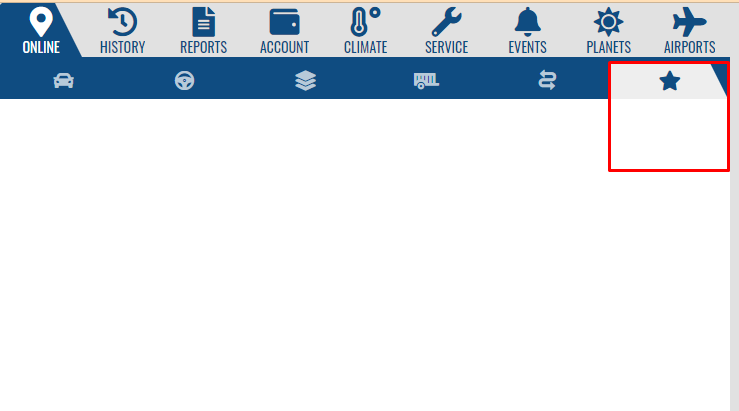
skeleton.navigation.online - tab bar of the global tab Online. the component added to it must be inherited from the Ext.panel.Panel class or its descendants and have the iconCls and iconAlign: 'top' parameters to display the tab.
Example:
|
Result:
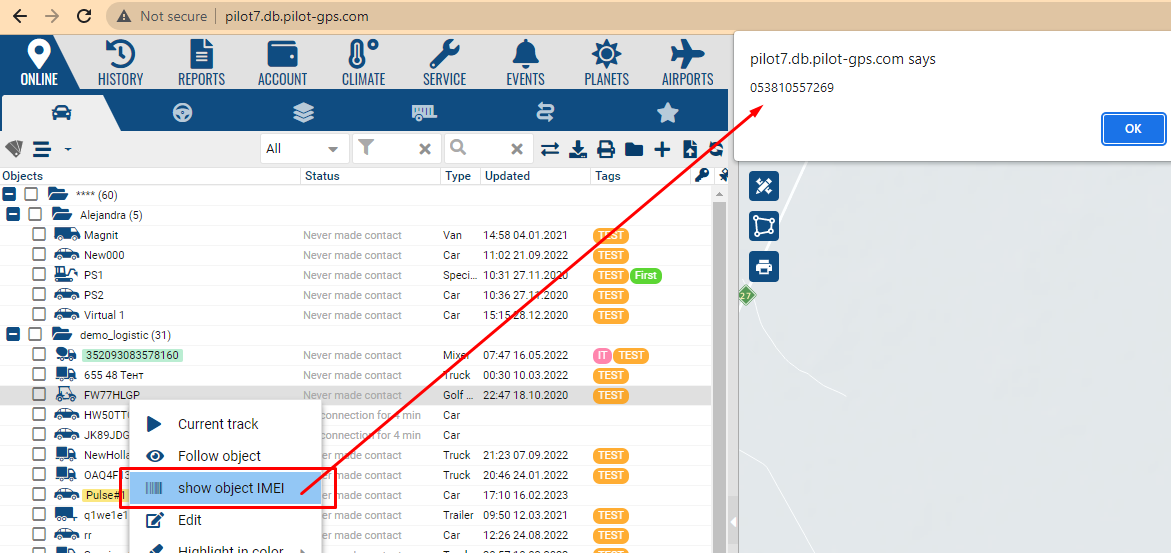
skeleton.navigation.online.online_tree - the main online object tree. It is possible to manipulate the tree as an Ext.tree.Panel object
skeleton.navigation.online.online_tree.contextmenu - object's context menu. you can add a menu and get a record in the handler with the properties of the object.
Example:
|
Result:
Using Backend PILOT API Functions
getting object tree (GET)
can be used in Ext.data.TreeStore
Available at url base_url+' /ax/tree.php'
Options:
-
Checkboxes (1|0) - whether to send checked parameters in the response to display checkboxes of tree elements
-
Cehs (1|0) - send a full tree with objects or only folders
-
Checked (1|0) - default state of checkboxes
-
State (1|2|3 |4) type of tree
Using the Maps API Functions
Map initialization.
var map = new MapContainer('map_name');
map.init(lat, lon, zoom, div_id, config);
-
Map_name - map name that will be available in map.name variable
-
Lat, lon - map center coordinates when displayed
-
Zoom - increase the map when displayed
-
Div_id - id of the html element in which to display the map
-
Config - additional leaflet configuration options https://leafletjs.com/reference.html#map-option or false if not needed
The html element into which the map is embedded must exist at the time the map is created, therefore, when initializing the component, it is recommended to call the map initialization code in the render event handler.
Example for a component inherited from Ext.panel.Panel:
Ext.define('Store.airports.Map', {
extend: 'Ext.panel.Panel',
xtype: 'store-airports-map',
layout: 'fit',
initComponent: function () {
this.listeners= {
render: function () {
var zoom = localStorage.getItem('zoom');
if (!zoom) {
zoom = 4;
}
var lat = localStorage.getItem('lat');
if (!lat) {
lat = 55.75;
}
var lon = localStorage.getItem('lon');
if (!lon) {
lon = 37.65;
}
this.map = new MapContainer('airports');
this.map.init(lat, lon, zoom, this.id + '-body', false);
},
resize: function (me, width, height, oldWidth, oldHeight, eOpts) {
this.map.checkResize();
}
};
this.callParent();
}
}
);
Working with polygons
create a polygon:
map.setPolygon(points,options);
remove polygon:
map.removePolygon(id);
remove all polygons:
map.clearAllPolygons();
Options:
-
Points - array of arrays with points [latitude, longitude]
-
Options - json with options (optional)
-
Color - color (html)
-
Id - polygon identifier for subsequent search or removal
-
label - the name displayed on the polygon
Example:
|
var latlngs = [[51, 17 ],[54.2, 16.3],[53, 20.44],[52, 23.1],[49,21]];
mapContainer.setPolygon(latlngs,{color:"#ee0033",id:1,label:"My NEW Polygon"});
|
Result:
Working with markers
Create marker:
map.addMarker();
Remove marker:
map.deleteMarker(id);
Parameters:
-
id - Id by which the marker can be found
-
lat - latitude
-
lon - longitude
-
icon - url of the marker icon
-
configuration - object of additional marker parameters, //TODO describe
-
storage - an object for storing any marker information for later work with it
-
size - size micro, mini, medium, big or use x y for exact size,
-
x - h size in pixels
-
y - size in pixels
-
opacity - transparency on 0 to 1
-
poupContent - html to show when clicking on the marker
-
data - data for autobuilding html for poupContnent by getMarkerContent2 method
-
tooltip - marker label, object with parameters:
{msg: "marker text",
options: {
direction: 'bottom' // position
}
},
-
click - function when clicking on the marker
-
dragend - a function when the marker is dragged
-
animations - marker animation, object:
[{
name: 'bounce', animation type
options: { animation options
times: 3
}
}],
contextmenu - context menu, object:
[{
text: 'element',
index: 0,
callback: function(){}
}],
notBindToMap - true - do not show the marker on the map (required for clusters ),
notPushedState - true - Do not add to the array of global markers
label - marker label
{
text: -- marker label - text
options: {} -- marker label options
},
customOptions:
{
type: string - you can select markers in a scope, then delete them all at once
}
Marker control functions:
-
GetLatLng -- return latLng
-
ShowPoup -- show content poupContent
-
Focus -- set map center to marker / args 1: zoom, args 2: duration in ms
-
GetId -- get id / return string
-
ClearListeners -- remove all marker listeners / to optimize
-
OnBounds -- start marker animation
-
GetSizeName -- return icon size name ( micro , mini , medium , big )
-
SetStorage -- add storage info / args 1: key , args 2: value
-
GetStorage -- get info / args 1: key
-
MoveTo -- set new coordinates for animation marker / args: 1 - latlng , 2 - duration of animation in seconds
-
RemoveAnimate -- remove timer id for animated marker
Marker events:
-
click -- args 1: callback(marker) //if click options are set.
-
dragend -- args 1: callback(marker, event) //if marker drag options are set.
Example :
|
map.addMarker({id:"111",lat:55.75455,lon:37.62165,icon:'https://pilot-gps.com/images/icons/bus.png',
x:60, y:40 ,opacity:1,label:{text:'BUS'}});
|
Result :
Clusters.
Clusters on the map are groups of closely spaced markers that are combined into one icon to reduce the number of objects displayed on the map. This allows to reduce the load on the map and improve its performance. When you click on a cluster, the scale of the map changes in such a way as to display all the markers included in the cluster. Clusters are often used in interactive maps such as store maps, tourist maps, and restaurant maps where a large number of markers need to be displayed on the map.
Method: addCluster
Parameters:
•Markers - An object containing the markers to be added to the cluster. The object must have the structure [{lat, lng, id}, {lat, lng, id}, ...], where lat and lng are marker coordinates, id is a unique marker identifier.
•Options - An object containing the options for the cluster. Settings can be as follows:
-
ChunkedLoading - Boolean value indicating whether to use incremental loading of tokens when clustering. The default value is set to true.
-
SpiderfyDistanceMultiplier - distance multiplier for grouped markers in spider clustering. The default value is set to is 5.
-
IsClusterHoverContent - Boolean value indicating whether a pop-up window should be displayed with additional information when hovering over a cluster. The default value is set to false.
Cluster object methods:
•Focus() - the method allows you to set the map scale so that all cluster markers are visible on it.
•RemoveMarkers(layers) - method to remove markers from the cluster. Accepts an array of markers to be removed.
•AppendMarkers(markers) - method to add markers to the cluster. Accepts an array of markers to be added.
•UpdateMarkers(updateMarkers) - method to update cluster markers. Accepts an array of markers to be updated.
Return value:
The function returns a cluster object.
Create a cluster
|
const markers = [{
lat: 50.1, lon: 30.5, id: 'marker1'
}, {
lat: 50.2, lon: 30.6, id: 'marker2'
}, {
lat: 50.3, lon: 30.7, id: 'marker3'
}];
const cluster = mapContainer.addCluster(markers, {
chunkedLoading: false,
spiderfyDistanceMultiplier: 4,
isClusterHoverContent: true,
id: 'cluster1'
});
cluster.focus();
|
Method: getCluster
The getCluster(id) function returns a cluster with the given identifier (id) from an array of clusters.
Options :
-
Id (required): The ID of the cluster to find.
Returns :
-
The cluster with the given identifier (id).
Exceptions :
•If the id argument is not given, the function throws an error with the message "Call method getCluster.
Argument id is null".
If a cluster with the given identifier (id) is found, the function returns this cluster. Otherwise, the function prints a warning to the console with the message "Cluster with id: {id} not found" and returns null.
Deleting a cluster
|
сonst cluster = map.getCluster('cluster-1');cluster.focus();
|
Method: removeCluster
The removeCluster function removes a cluster from the map by its id and removes all markers belonging to this cluster.
Options:
-
Id- a string value identifying the cluster to be removed.
Return value:
The function returns a reference to the current map object.
Usage example:
Deleting a cluster
|
// Delete the cluster с id "cluster-1"
map.removeCluster("cluster-1");
// Delete the clusterр с id "cluster-2"
map.removeCluster("cluster-2");
|
Method: clearAllClusters
The function clearAllClustersremoves all clusters from the map.
Options:
The function takes no parameters.
Return value:
The function does not return a value.
Usage example:
Removing clusters
|
map.clearAllClusters()
|
Method: recreateVehiclesCluster
The function recreateVehiclesClusterrecreates vehicle marker clusters.
Parameters: The function does not take any parameters.
Return value: The function does not return any values.
Actions:
1.The presence of a cluster of vehicle markers is checked using the getCluster method.
2.If the cluster is found, then all animated markers on the map are removed using the removeAllAnimateMarkers method.
3.Then the found cluster is removed using the removeCluster method.
4.A new cluster is created, markers from the previous cluster are added using the addCluster method, and the cluster settings are passed to the options object.
5.Expect 1 second with setTimeout method.
Usage example:
recreateVehiclesCluster
|
map.recreateVehiclesCluster()
|
Circles.
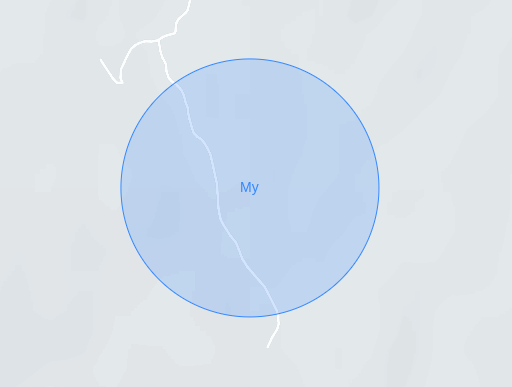
addCircle function
The addCircle(options, marker) method adds a circle element to the map.
Options :
•Options - an object with parameters that can be passed to create a circle. Possible options:
-
Id - circle identifier. Mandatory parameter.
-
Lat - latitude of the center of the circle. Mandatory parameter if the marker parameter is not passed.
-
Lng - longitude of the center of the circle. Mandatory parameter if the marker parameter is not passed.
-
Radius - circle radius in meters. Mandatory parameter.
-
Label - label text for the circle. Optional parameter.
-
Color - circle color in #RRGGBB format. Optional parameter.
-
Weight - circle line width in pixels. Optional parameter.
•Marker - the marker to which the circle should be attached. Optional parameter.
Methods :
-
setColor() - change the color of the circle
-
focus() - map focus on the circle
Returns : the circle created on the map.
Usage example:
recreateVehiclesCluster
|
const circle = mapContainer.addCircle({
id: "myCircle",
lat: 35.71084,
lng: 45.35156,
radius: 500,
label: "My"
});
|
GetCircle function
The addCircle(options, marker) method adds a circle element to the map.
The getCircle(id) method is a function that takes an id as a parameter and returns a circle from the circles array whose id property value matches the passed id value.
Options:
-
id- circle ID
Return value:
-
A circle object whose property value idis equal to the passed id. If a circle with such idis not found, the method will return undefined.
Usage example:
recreateVehiclesCluster
|
const circle = mapContainer.getCircle('myCircle')
|
RemoveCircle function
The removeCircle(id) method is a function that removes a circle from the circles array whose id property value matches the passed id value.
Deleting a circle also deletes its associated lines and elements on the canvas associated with the circle.
Options:
-
Id- number or string, circle identifier
Return value:
-
The method does not return a value, it changes the array circlesand removes the circle from it with the passed id.
Usage example:
recreateVehiclesCluster
|
mapContainer.removeCircle('myCircle')
|
RemoveAllCircles function
The removeAllCircles(type) method is a function that removes all circles from the circles array.
The method also removes the items on the canvas associated with each circle.
Options:
-
Type- string, type of circles to delete. This parameter is optional.If not passed, the method removes all circles from the circles.
Return value:
-
The method does not return a value, it changes the array circlesand removes all circles from it.
Usage example:
recreateVehiclesCluster
|
[
{ id: 1, radius: 10, type: 'red' },
{ id: 2, radius: 20, type: 'green' },
{ id: 3, radius: 30, type: 'red' }
].forEach(circle => mapContainer.addCircle(circle));
mapContainer.removeAllCircles('red');
console.log(mapContainer.circles); // [{ id: 2, radius: 20, type: 'green' }]
|
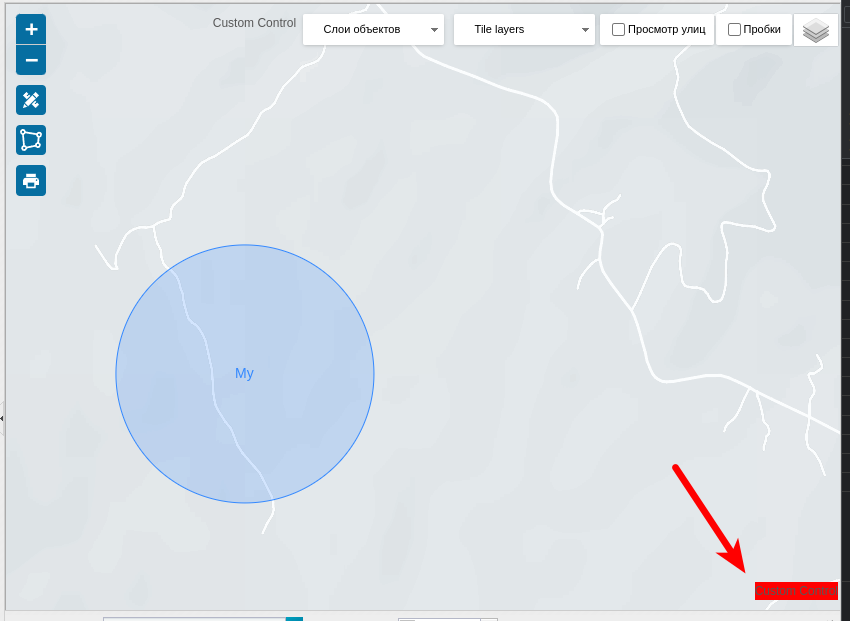
CustomControls.
The addCustomContro l(name, domEl, position) method allows you to add a custom control to the map.
AddCustomControl Function
Options:
-
Name- string, name of the new user control.
-
DomEl- The DOM element to be used as the user control.
-
Position- a string that defines the position of the control on the map.This parameter is optional, by default the control is placed in the upper right corner of the map.
Return value:
-
The method does not return a value.
Usage example:
recreateVehiclesCluster
|
var customControl = document.createElement('div');
customControl.style.background = '#ff0000';
customControl.innerHTML = 'Custom Control';
mapContainer.addCustomControl('customControl1', customControl, 'bottomright');
|
RemoveCustomControl function
The method removeCustomControl(name)removes the user control from the map.
Options:
-
name- string, name of the user control to be removed.
Return value:
-
The method does not return a value.
Usage example:
recreateVehiclesCluster
|
mapContainer.removeCustomControl('customControl');
|
How the method works:
-
The method iterates through the array customControlsand finds the control with the given name.
-
If the control is found, the method is called remove()to remove the control from the map.
-
The method removes the control from the customControls.
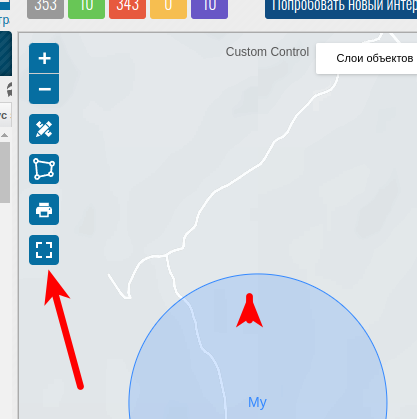
setFullscreen function
The method setFullscreen(isActive)allows you to set the full screen mode of the map.
Options:
-
IsActive- a boolean value that determines whether the full screen mode of the map is enabled.
Return value:
-
The method does not return a value.
Usage example:
recreateVehiclesCluster
|
mapContainer.setFullscreen(true);
|
How the method works:
•The method uses localStorage.setItem() to save the value of the boolean variable isActive with key 'fullscreen'.
•If isActive is true, the method creates a new instance of the L.Control.Fullscreen() control and adds it to the map using this.addControlMap().
This allows you to switch the map to full screen mode.
•If isActive equals false, the method removes the control with ID 'fullscreen' using this.removeControlMap(). This exits full screen mode.
Errors:
-
If isActivenot a boolean value, the method will not work correctly.
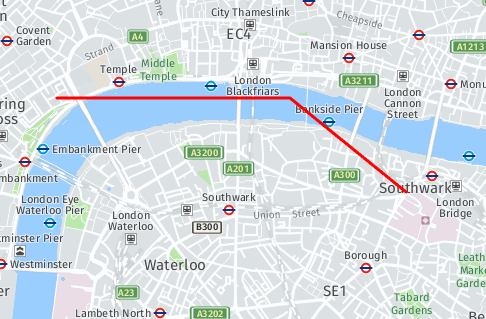
Polylines.
addPolyline function
The method addPolyline(points, options)adds a polyline to the map.
Options:
•Points - array of polyline points, each point is an array [lat, lng] with point coordinates.
•Options - object with polyline settings:
-
ClassName - string, CSS class to be applied to the polyline.
-
Color - string, polyline color in '#RRGGBB' format.
-
Id - string, unique identifier of the polyline.
Return value:
-
Polyline object with two properties:
-
Id- string, polyline unique identifier.
-
Layer- polyline layer object.
Usage example:
recreateVehiclesCluster
|
var points = [[51.505, -0.09], [51.51, -0.1], [51.51, -0.12]];
var options = {
color: '#FF0000',
id: 'myPolyline'
};
var polyline = mapContainer.addPolyline(points, options);
|
How the method works:
•The method uses L.polyline() to create a new polyline based on the points array and the options object.
•If the options object has a color parameter, the method uses layer.setStyle() to set the color of the polyline.
•The method creates a unique polyline identifier based on the points array of points if the options.id parameter is not specified.
•The method removes an existing polyline with the same id, if any, using this.removePolyline(id).
•The method adds a new polyline layer to the map using layer.addTo().
•The method adds a new polyline to the polylines array as an object with an identifier and a polyline layer.
•The method returns a polyline object.
Errors:
•If points are not an array or does not contain arrays of points [lat, lng], the method will not work correctly.
•If options.className is not a string, the method will not work correctly.
•If options.color is not a string in the format '#RRGGBB', the method will not work correctly.
•If options.id is not a string, the method will not work correctly.
RemovePolyline function
This method is used to remove a polyline from the map and from the list of lines on the map. It takes one argument id - the ID of the line to be removed.
If the id argument is missing, the method throws an "Error call method removePolyline" error.
RecreateVehiclesCluster
|
mapContainer.removePolyline('myPolyline');
|
getPolyline Function
This method is used to get the line with the specified ID. It takes one argument id - the ID of the line to get.
The method iterates through the list of lines on the map and finds the line with the passed ID using the find() method. If no line with the specified ID is found, the method returns undefined. If the line is found, the method returns an object with two properties: id - line identifier, layer - line layer object on the map.
recreateVehiclesCluster
|
mapContainer.getPolyline('myPolyline');
|
History tracks
addHistoryTrack function
The addHistoryTrack function is used to add and display a route on the map.
Function parameters
data: An object containing information about the route. It must contain the following properties:
•Points (required): An array containing the coordinates of the waypoints. Each array element must be an array containing latitude, longitude, speed, timestamp values
•Markers (optional): An array of marker objects on the map.
Parameters: An object containing additional options. It may contain the following properties:
•Id (optional): Route ID.
•Color (optional): The color of the route on the map.
•Width (optional): The width of the route on the map.
•Polyline (optional): Additional options for the route line.
Return Values
The historyTrack object is returned.
Methods
•AddMarker(options): Adds a marker to the map and stores it in the markers array.
•GetMarker(id): returns the marker with the given id from the markers array.
•UpdateMarker(options, callback): updates the coordinates of the marker with the given id or adds a new marker to the map if there is no marker with the same id yet. If a callback is given, it will be called after the token has been updated.
•RemoveMarker(id): removes the marker with the given id from the markers array and from the map.
•Focus(): Centers the map on the polylines.
Usage example:
RecreateVehiclesCluster
|
var data = {
points: [
[55.75222, 37.61556, 0, 1617206400], // 0 lat, 1 lng, 2 speed, 3 timestamp
[55.74896, 37.62011, 10, 1617206460],
[55.7437, 37.62343, 20, 1617206520],
[55.7379, 37.62368, 30, 1617206580],
[55.73148, 37.62289, 40, 1617206640],
[55.72444, 37.621, 50, 1617206700],
[55.71629, 37.61875, 60, 1617206760],
[55.71145, 37.61775, 70, 1617206820],
[55.7054, 37.61752, 80, 1617206880],
[55.69833, 37.61611, 90, 1617206940],
[55.69164, 37.61401, 100, 1617207000]
],
markers: [
{
lat: 55.75222,
lon: 37.61556,
id: 1,
popup: {
content: 'Start'
}
},
{
lat: 55.69164,
lon: 37.61401,
id: 2,
popup: {
content: 'Finish'
}
}
]
};
var options = {
id: 1,
};
mapContainer.addHistoryTrack(data, { id: 'history-track', width: 10 });
|
RemoveHistoryTrack function
The method removeHistoryTrack(id)removes historyTrack from the map
Options:
-
id- track ID.
Usage example:
recreateVehiclesCluster
|
mapContainer.removeHistoryTrack('history-track');
|
getHistoryTrack function
The getHistoryTrack method (id)returns a historyTrack object
Options:
-
id- track ID.
Usage example:
recreateVehiclesCluster
|
mapContainer.getHistoryTrack('history-track');
|